Author Archive | WebbPlatsen

3. Putting your stamp on it – Creating your confirmation and welcome email

A confirmation or welcome email is a message sent to an individual after a specific action has been taken by that person, such as subscribing to an email list. Our application lets you automate this action and tailor it to fit your branding.

Why this is important

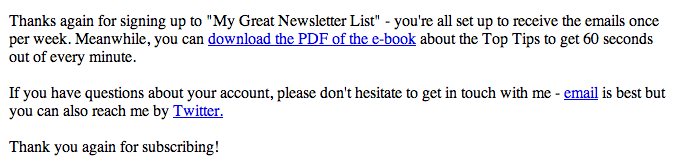
Your welcome emails are going to be the first impression your subscribers have of your newsletter. They’re also a good place to greet customers and ask them to add your email address to their safe senders list. Furthermore, personalizing your confirmation email will help your communication sound more human.

How to create your welcome email automation

You can automate your confirmation email, which will result in an immediate and seamless contact with your subscribers. Here’s how to do it:

1. Select Automations in the top menu.


2. Click the Green + Sign to create a new automation.

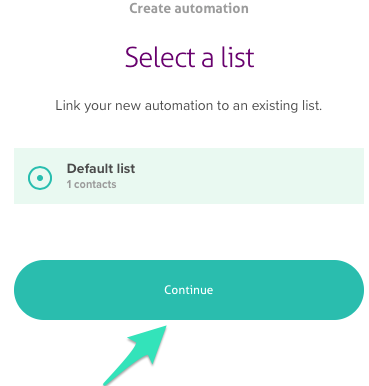
3. Select an existing list and click Continue to connect the new automation.


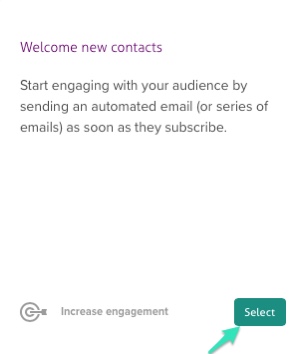
4. In the Prebuilt automations tab, select the Welcome new contacts panel. You will then be taken to the edit automation page.


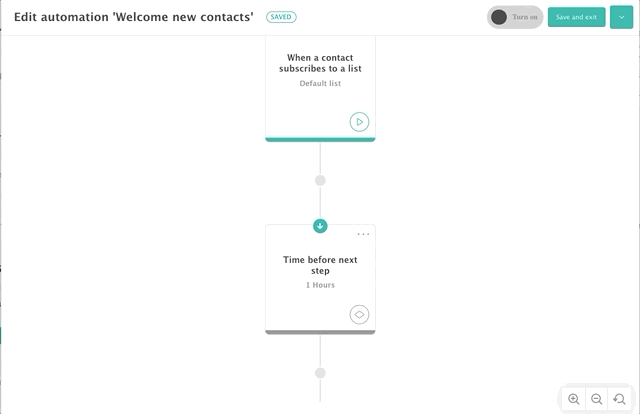
5. Specify the delay for the action on edit condition:


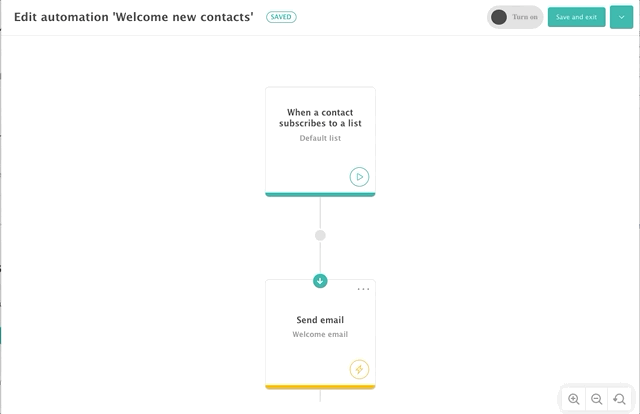
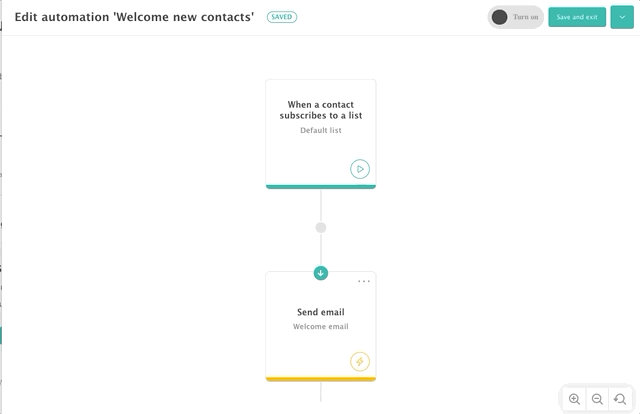
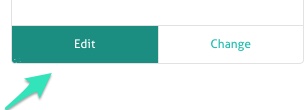
6. Select the Send email action from the workflow display.

Click on Edit to customize the email.


7. Use the email designer to personalize your confirmation email. Find a description of this tool here.
8. When done editing the email click on Save and exit.


9. Toggle on the automation by selecting the button at the top right.


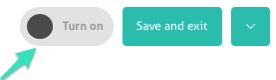
10. Select Save and exit.

An email with your personalized welcome will be sent to your new recipient automatically whenever they subscribe to your content after the determined delay.

Continue Reading

7. Make it Personal

One of the best parts about email marketing is that you can target specific groups of people quickly and easily. Moreover, you can personalize each email so that relevant information appears. To do this, you’ll need to start by creating a form that’s tailored to your needs.

Advanced HTML user? You can create a fully customized form.

Getting the information you need:

In order for your form to relfect the information you need, you have to add fields to your list.

Adding a field Manually

  • Click on the Contact list tab and click on the list name.
  • Click on Manage List Structure on the left hand menu.
  • Click the Add a new field button
    • Give the field a name (“CatOwner”)
      Note: 
      Fields must be alpha-numeric, with no spaces or special characters or punctuation.
      
    • Select the type of field this is (Text, Number or Date)
    • Click Create
    • Repeat as needed

Note: Avoid asking for too much information: you don’t want your customers to have to fill in so much information that they’ll get bored and simply not subscribe instead. Keep it between 3 or 4 fields.

Adding a field via a CSV upload

When you upload a list, you will be able to Match Fields.

    • Column Headers in your CSV file will be shown under Field.
    • You can then choose to Don’t Keep or to Keep with radio buttons.
    • You can Choose a field you had previously created or Give the field a new name (the text box will auto-fill with the name from your file which you can overwrite)

Finding the Form


  • Click on the Contact list tab and click on the list name.
  • Click on Manage Forms on the left hand menu.
  • In the Subscription form section:
  • Click on Grab the HTML code button
  • Select all, copy and paste to your website.

OR

  • Click on the Link to the online form
  • Copy the link
  • Provide the link on your Facebook page or post it on Twitter.

Note: Every field mapped to your contact list will show on your form.

Now that your form is set up and your fields are in place, it’s time to use the information to send targetted emails.

Create groups


To improve engagement with your contact list, create groups in your list according to common features within your list, and send them content that’s directly pertinent to their interest.

Continue Reading

How do I customize a form?

Our system allows you to integrate subscribe and unsubscribe forms for a specific contact list directly into your website. While we provide a very basic form, you can further customize it by adding radio buttons, checkboxes, and dropdown menus.

The most important rule to abide by is to have the “input name” be the exact same as the field you have created in your list. This will allow your personalized field to be filled out by whatever value you wish to be added.

Radio Buttons


<input type=”radio” />
defines a radio button. Radio buttons let a user select only one of a limited number of choices. For example:

<form>
Gender
<input type=”radio” name=”Gender” value=”male” /> Male <br />
<input type=”radio” name=”Gender” value=”female” /> Female
</form>

This will allow the subscriber to select from the values Male or Female – which will automatically populate the field in your list.

It will look like this in your form:


Checkboxes


<input type=”checkbox” /> defines a checkbox. Checkboxes let a user select one or more options of a limited number of choices. Fields can only take in one data value, so limit this to yes/no answers.

<form> Do you like sports? <input type=”checkbox” name=”sport” value=”Yes” /> Yes <br /> </form>

This will allow you to fill in all appropriate fields in your list with the values you are offering. All fields not selected will appear with the value N/A.

It will look like this in your form:


Dropdown Menus

The

<select>
tag is used to create a drop-down list. In this case, we are using select name to define which field the data will populate.

Select one of the following
<select name=”car” >
<option>Volvo</option>
<option>Nissan</option>
<option>Mercedes</option>
<option>Audi</option>
</select>[/box]

It will look like this in your form:


Using the example codes above, here is a full form in action

<form method=’get’ accept-charset=’UTF-8′ name=’oi_form’ action=’http://mydummyaccount.com/list/2349234234234234′>
Email <br /> <input type=’text’ name=’email’/><br />
Name <br /> <input type=’text’ name=’first_name’/><br />
Last <br /> <input type=’text’ name=’last_name’/><br /><br />
Gender <input type=”radio” name=”Gender” value=”Male” /> Male
<input type=”radio” name=”Gender” value=”Female” /> Female <br /><br />
Do you like sports? <br />
<input type=”checkbox” name=”Sport” value=”Yes” /> Yes <br />
Vehicle: <select name=”Vehicle” >
<option>Volvo</option>
<option>Nissan</option>
<option>Mercedes</option>
<option>Audi</option>
</select>
<input type=’hidden’ name=’goto’ value=” />
<input type=’hidden’ name=’iehack’ value=’☠’ />
<input type=’submit’ value=’Subscribe’ />
</form>

The form will look like this

Form

And the subscriber information will show up in your WebbPlatsen account

Subscribers information

Continue Reading

What is a ‘Welcome Email’?

A welcome message is an optional email that you can choose to send to new subscribers who use a sign up form.

The email is either sent immediately, if your list is a single opt-in or once they have confirmed their email address if your list is a double opt-in.

The email that is pre-set up in your account looks like this: 

To set up and edit your welcome email, access your contact list and click on Manage Emails on the left hand menu.

Under Welcome Email you will see the option to preview and edit both HTML and text versions of the email, send a test, and active/deactivate it.

A few good things to have in your welcome email


  • Your logo
  • Confirmed: A short message confirming that they’ve been added to the list.
  • Be true to your word: If you promised something as a bonus for signing up to the newsletter, this is the best place to provide it – a link to an ebook, a coupon code they can redeem or details about a special event you host should be in the welcome email.
  • Be Human: Give them a contact they can get in touch with – even if it’s only by email.

Continue Reading

My email went to my junk folder, why?

There are several factors that may direct your email to your junk folder instead of directly into your inbox. Check the following to improve deliverability:

Content


  • Avoid the overuse of ‘SPAM’ words (Free!, gambling related terms, too many exclamation points, ALL CAPS)
  • Make sure your Text version matches your HTML version.

Image-to-text-ratio


  • A maximum of 40% image coverage. We recommend having several, smaller images with clear, descriptive alternate texts. This will help by:
    • Preventing the email to be flagged as spam
    • Encouraging people to display images (yielding you more accurate reports)
    • Help loading time of emails
  • A minimum 60% text coverage
  • Not all images touching
  • At least 400 characters of text As per anti-spam law, all emails must contain some form of text (even if it a simple “hello”).

Make sure you are recognized as a legitimate sender


  • Follow best practices and use a double opt-in process. Test your form sing up process by signing yourself up for the newsletter and see where it lands.
  • Make sure your recipients add you to their whitelist or address book.
  • Make sure your recipients click on ‘always display images from this sender’ – which will let the email service know that you are a trusted sender.
  • Use your own domain
  • Validate your email address
Continue Reading

How do I reconfirm a list?

Reconfirming your list will help you make sure that your list is clean and all recipients have given you consent to send them emails.

If you create a double opt-in list and upload the contact list yourself, there are two options to re-confirm their subscription:

Method 1


2-step double opt-in:

  • Create a double opt-in list and add a subscription form for this list to your website
  • Upload the list of your existing contacts and create a campaign asking them to confirm that they would like to receive emails from you in the future by clicking the link that takes them to the form you just put on your website.
  • After your campaign is complete, only those who completed your new subscription form will remain on the list, your old list should be discarded.

Method 2


1-step opt-in:

  • Create a “Thank you” landing page on your website
  • Upload the list of your existing contacts and create a campaign with a link asking people to click if they want to sign up, which sends them to the landing page you just created
  • After mailing is complete, you can take all the clicks and upload them to a new list, discarding the old list.

This method should be used on a regular basis (every three to six months), especially with people who haven’t clicked or opened emails in some time.

This process will improve delivery by decreasing complaints, removing invalid addresses, and increase the overall engagement for your list.

Sample


Your emails should always contain your logo (ideally, on the top left corner), your physical address and an unsubscribe link.

If you have your logo in the top left corner of your email, the alt text on your logo will be the preheader text, which shows in the preview of the email for many email clients. Otherwise, the preheader text will be the first sentence of your campaign.

Subject: Please confirm to stay on the list

Preheader: We don’t want to send you emails you don’t want! Please confirm that you wish to receive our newsletter by clicking on the link below.


Hi [FirstName,there],

This is a quick email from the folks at ___company x___.

At one point, you signed up for our service and opted-in to receive our email newsletter. But lately we’ve been so busy that we haven’t been sending out any newsletters at all. We’ve got lots of exciting news coming up and are going to start sending out our `___company x___` email news at the beginning of every month to tell you all about our news, updates, and other goodies.

If you’re still interested in hearing from us, just click on the link below to add yourself to our list again. If you’re not interested in hearing from us again, simply click on unsubscribe below, or do nothing, and we’ll remove you from our list.

Thanks!

Your Name

___company x___

Continue Reading

What is a bounce?

A bounce occurs when a campaign is not delivered to a recipient.

A “soft” bounce is a temporary error that does not result in the removal of the recipient from the mailing list but may delay delivery to that person.

A “hard” bounce is an undeliverable message resulting from an email address or domain that is determined to be unreachable after a single attempt.

Bounce Reporting


You can see your detailed bounce report by clicking on View Detailed Statistics on the left hand menu of your delivered campaign. Here’s a brief description of what each means.

Soft bounce (bounce_sb)

A soft bounce is an e-mail message that gets as far as the recipient’s mail server but is bounced back as undelivered before it gets to the intended recipient. This might happen because the recipient’s inbox is full and it may be deliverable at a later time. After three delivery attempts, it will become a hard bounce.

Transient bounce (bounce_tr)

A transient bounce is often generated by the sender’s email server which indicates that a message could not be delivered but the server is still trying. Usually, a transient bounce can be safely ignored. You might receive the following message: Warning: message still undelivered after 4 hours. Will keep trying until message is 2 days old.

Address Change (bounce_ac)

An Address Change response means a recipient has changed their address and is sending an automatic reply to notify senders of their new address.

AutoReply (bounce_ar)

Auto-Replies (generally in the form of an out of office notice) are usually sent by a recipient’s email client. Unlike bounces, these indicate that an email recipient is temporarily unavailable. These notifications are useful when sending time-sensitive information to recipients, as they serve to alert you that the recipient may not see it until later. These can otherwise be safely ignored.

Challenge/Response (bounce_cr)

A Challenge/Response reply is a message sent by special filtering software installed by the recipient designed to accept messages from only senders they know. This type of filter automatically sends a reply with a challenge (a question or required action) to the sender of the e-mail. If the challenge is not completed correctly, the message is not delivered.

DNS failure (bounce_df)

The email server is temporarily unable to deliver your message to an email address because of a DNS problem.

Hard Bounce (bounce_hb)

A hard bounce is an e-mail message that has been returned to the sender because the recipient’s address is invalid. A hard bounce might occur because the domain name doesn’t exist or because the recipient is unknown.

Email blocked (bounce_mb)

Indicates that the recipient’s email server is blocking email from your email server. You may see the following messages returned to you:

– 550 Message REFUSED by peer

– 552 Blocked by filters

Mailbox is full (bounce_mf)

The email server is temporarily unable to deliver your message to the recipient email address because the recipient’s email box is full.

Continue Reading

Why do I need an unsubscribe link?

In order to meet the requirements of anti-spam legislation, you must include an unsubscribe link as part of your email content. If an unsubscribe link is not included, you will not be able to schedule your campaign.

By default, all of our templates already include an unsubscribe link – so you shouldn’t have to worry about not complying with anti-spam laws.

If you create and upload a template that does not contain an unsubscribe link, one will be added by the system in your campaign’s footer.

Continue Reading

Why do I need to add my physical/street address to my campaign?

In order to meet the requirements of anti-spam legislation, you must include a physical/street address as part of your email content. This address is used to indentify the sender of the message and facilitate how this person would have opted-in and who they can contact to opt-out. Some content filters will scan for it and block/junk emails that don’t have it so it will also improve delivery.

In order to protect subscribers (and yourself), if a physical address is not included, you will not be able to schedule your campaign.

The first time you log in to your mailRelate account, you’ll be prompted to fill in the information.

In the future, if you need to edit it, simply go to Settings > Company Profile

If for whatever reason the company information is missing, a window will pop up asking you to fill in your company details.

Continue Reading