Author Archive | WebbPlatsen

Campaign Reporting Details

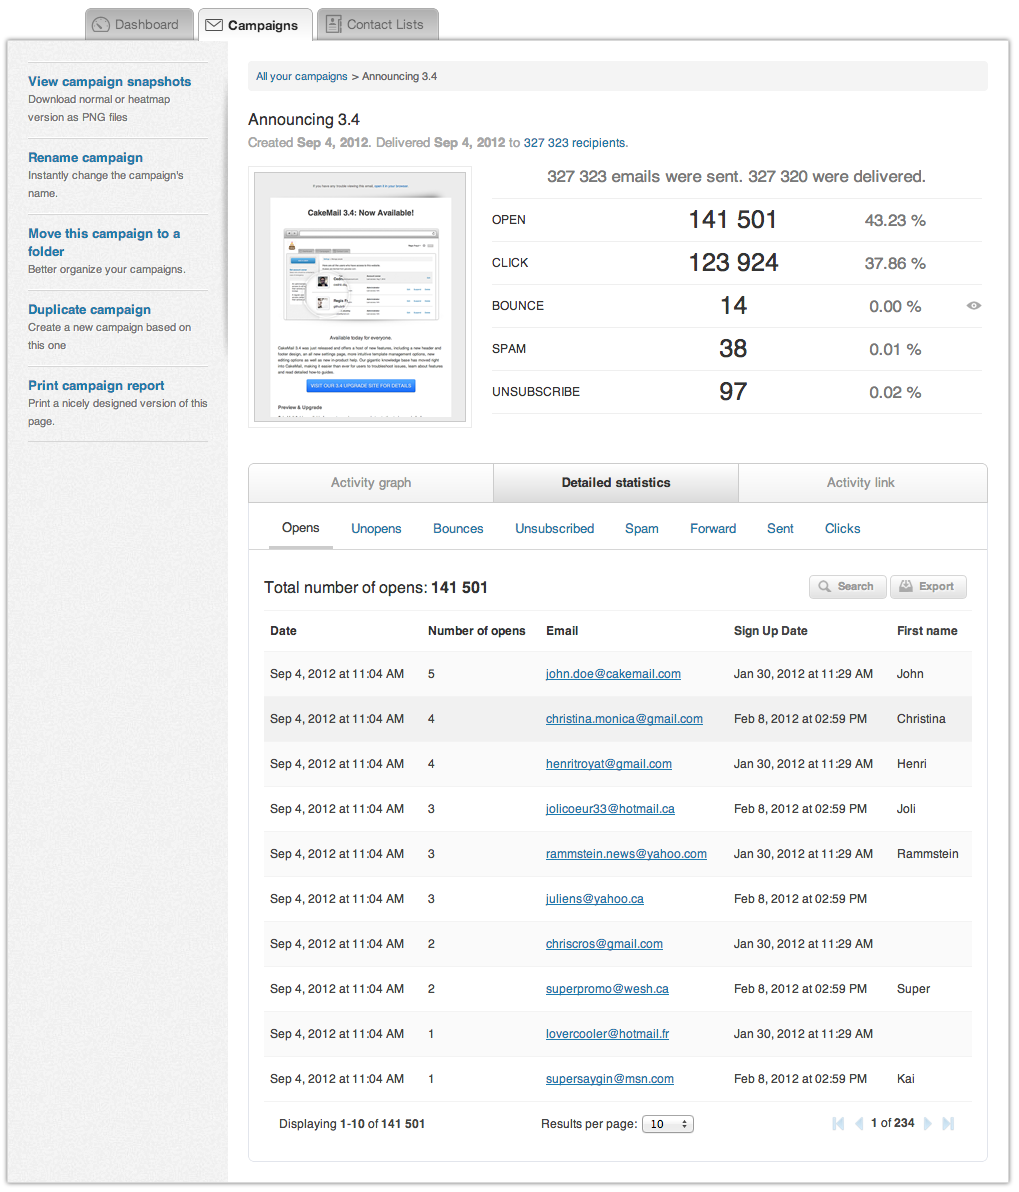
To help you understand the details of your report, here are the specifics of your reporting details:

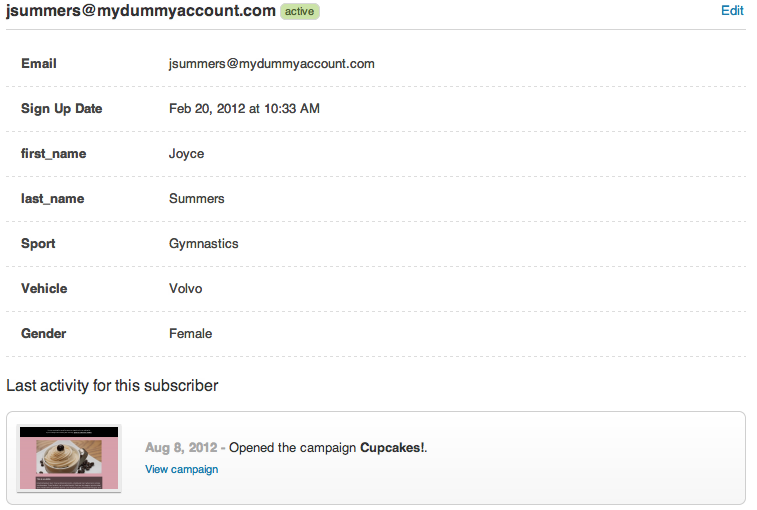
  • Open – The campaign was viewed by the recipient. What counts as an open?
  • Unopened – The campaign was delivered but not opened by the recipient.
  • Bounce – The campaign was not delivered successfully. Various reasons may affect the delivery of a campaign, and most bounce messages are returned with information on the error.
  • Unsubscribed – Who unsubscribed from your campaign.
  • Spam – The campaign was marked as spam by the recipient – available by provider.
  • Forward – The campaign was forwarded by the recipient to a friend. This is done via the [FORWARD] action tag.
  • Sent (sometimes appears as in_queue) – Means the email was delivered successfully.
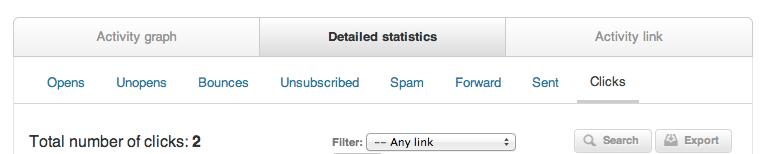
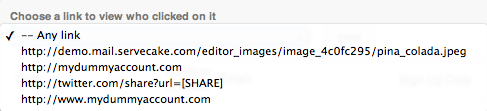
  • Clicks – Who clicked on what link.
  • Social – Number of times your campaign was shared on Twitter/Facebook.
Continue Reading

How do I create a contact list?

Before sending your first campaign, you must have at least one active list with at least one valid recipient.

The Contact List tab will show you the number of active lists, subscribers, the number of emails sent and the engagement percentage.

To create a new contact list, click on the Create Contact List button on the left.

This will open a pop-up window where you can give your contact list a name, specify a Sender Name (who the users will see the emails are coming from) and a Sender Email (also your reply-to email address). Click on Create to complete the process.

All lists are automatically created as double opt-in. Although we recommend you keep this setting, you can change this.

To add a single contact to your list:


Immediately after the creation of your list you can start adding contacts by clicking on Add contacts on the left hand menu.

You will be asked to confirm that you have permission from the recipient(s) to add them to your list. It is important that you understand WebbPlatsen abides by anti-spam laws and we do not tolerate any form of spamming.

Click on the checkbox and go to the next step.

On the following page, click on Add A Single Contact on the left hand side and enter the email address you wish to add to your list. If you have any personalized fields on your list, they will appear here.

Once the recipient has been successfully added, you will see it under the active subscribers list.

You can also import multiple contacts to a list as a CSV.

Continue Reading

2. Personalizing it – Creating and adding a subscription form to your website

Subscription forms can be included in your website or blog so the visitors can provide their data to receive emails about topics of relevance and/or interest. Fundamentally, a subscription form is designed to register subscribers to your mailing list.

Why this is important

Subscription forms are a legal and convenient way for subscribers to provide you their information. The process of creating and setting them up is very straightforward. One of the great advantages of email marketing is that it allows you to target groups based on various criteria. By adding some of these criteria to your subscribe form, you can personalize your emails. As a general rule of thumb, however, requesting too much information may lead to less interest in subscribing. You’ll need to start by creating a form that’s tailored to your needs.

How to integrate a subscription form

Using our system, you can integrate an opt-in form for a specific contact list directly into your website.

You can obtain the form for your list by following these steps:

1. Select the Forms tab.


2. Click ‘…’ on the top right end of the Subscription form and then select Edit.


3. You will have the option to either use a direct link to the form, or grab the HTML code to embed on your site.


  • Linked form
    • It will give you the direct link to the form by clicking Get URL.


  • You can customize your form by clicking Edit form.


  • Embedded form
    • It will give you the code to embed on your website by selecting Get code.


  • Feel free to customize your form by clicking Edit form.


Edit your form

The following form elements are available in your editor:

  • Title with six different H sizes
  • In a paragraph, describe the type of communication that will be sent. Communication on a weekly or monthly basis, for example. Sign-up codes, promo codes, etc.
  • Custom attribute: An attribute that can be customized
  • Email (mandatory and by default)
  • Subscription button (mandatory and by default)
  • Hidden attribute in cases where you want a segment populated by default


  • You can select these elements to customize them. It is important to avoid asking for the wrong information: you don’t want your customers to find it overwhelming, so they simply stop subscribing. Three or four fields should suffice.


  • Click on the pencil icon to edit an element.
  • Click on the double square with a plus sign to duplicate an element.
  • Click the Trashcan icon to delete an element.

Your subscription form is ready

Use it to build your precious list and continue to generate leads for your account’s growth. The data you assemble will provide a source of new prospects for your organization, allowing it to continue expanding. Additionally, If you have any personalized fields on your list, they will be added to the form.

Continue Reading

How do I change my list’s details?

If you want to change your list’s details, such as sender name and email, your list’s name and your list’s language, you can do so from within your list’s options.

To change your sender name and email


Click on the Contact List tab and locate the correct list. On the left-hand menu click on Manage Emails > Set sender name & email.

Remember: this information will appear in the header of the email campaigns you create as well as the confirmation and welcome emails sent when someone signs up using a form.

To change your list’s name


Click on the Contact List tab and locate the correct list. Under the list name you will see the option to Rename.

You may also change the list name from within the list by clicking on Rename list

Continue Reading

How do I schedule my campaign for later?

Only regular campaigns can be scheduled to go out at a later date and time. Autoresponders, recurring campaigns, and A/B split tests all have their own (and slightly different) scheduling mechanisms.

When you reach the Schedule or Send section of the campaign creation process, you have the option of sending your campaign immediately or scheduling it for later. You have two calendar years (the current year and the next) to plan the delivery of your campaign. Select a specific time, and click on Schedule.

Continue Reading

How can I view the performance report of a specific campaign?

To view the performance report of a specific campaign, access it under the Campaigns tab after delivery. You will immediately see details such as who the campaign was sent to, clicks and open rates, emails bounced, spam complaints, and unsubscribes. If you added the Social Media Toolbar – stats are also available for Facebook and Twitter shares.

You may also see more specific details such as who clicked on what and even a detailed heatmap of the campaign’s activity, available on the left hand menu.

Continue Reading

How do I view who clicked on what link?

You can get additional details as to which of your contacts clicked on links in your campaign allowing you to contact interested parties by other means (such as calling them or a retargeting campaign with Google Adwords or Facebook). The information is also used to group contacts together to help you create targeted campaigns.

  • Click on a sent campaign.
  • Click Detailed statistics
  • Click on Clicked


  • Click on the dropdown to filter by link in your campaign

You will be able to see who clicked all links or filter by the different links you included in your campaign.

Continue Reading

How do I view/download the activity for a recipient?

To access the activity for a particular recipient, access your list and click on Manage Subscribers on the left hand menu. Clicking on the recipient’s email will give you access to the recipient’s profile and list of activities, including when they signed up, and latest emails they have opened.

To download the information you are currently viewing to your computer, click on Export activity as CSV on the left hand menu.

Continue Reading

Can I change my From Address?

The From address should be thought of as your online identity. It’s what your contacts use to recognize you as a sender, and will often get added to their Contact or “Safe list”. It’s a good idea to keep a standard “From” address when sending, but use different reply-to addresses, as needed.

Why being recognized is important:


  • Helps emails from this address land in the inbox, not the Junk folder,
  • Enables images and links by default, giving you more accurate open and click rates
  • Helps improves your Sender reputation. The more people you have adding your From address to their Address book, the better your reputation

How to change your from address


It’s sometimes necessary to change the from address – domain changes, restructuring, or other reasons). These are the steps to take if you must change it:

1. Tell everybody

Tell your contacts before you do it in a dedicated email campaign. Encourage them to add your new From address to their Contact list.

2. Warning Signs

Include a warning at the top of email campaigns leading up to the date you change over.

3. The domain

The new From domain should be the same URL as the one they used to sign up. For example: If they signed up at ‘http://www.yourdomain.com,’ your e-mail should come from something like ‘info@yourdomain.com’ or ‘info@billing.yourdomain.com.’ Additional recommendations for the domain.

Continue Reading