Author Archive | WebbPlatsen

4. Optimizing your deliverability – Authenticating your sender domain

Gone are the days when you would send an email and not have to worry about it getting delivered. SPAM has been around for almost as long as email, and receivers today have quite a job deciding what is real and what’s not. Wouldn’t it be great if legitimate senders had a clever way of helping them accomplish this? If there was only something we could do to help our email hit the Inbox and separate us from the junk. Well, keep reading because that’s exactly what Email Authentication is all about. We’ll show you how to do it in this article.

Why this is important

Authentication prevents spammers from using your domain to send emails without your permission. There are 3 main protocols in use today (SPF, DKIM, and DMARC) and each helps validate your email is legitimate in an effort to help maximize your delivery.

What is SPF?

Sender Policy Framework (SPF) is an authentication standard that has been around since 2003 and works by publishing a list of IP addresses that are allowed to send on your domain’s behalf. Receiving mail servers will use SPF to verify that messages sent from your domain were sent by one of these IP addresses. SPF authenticates the Return-Path: domain with the IP address used to send the email.

SPF helps protect your domain against spoofing and helps prevent your outgoing messages from being marked as spam by receiving servers. Whether the SPF passes (or fails) can be seen in the Authentication-Results: header. However, this only validates the server sending the email; it does not ensure that the content has not been tampered with. For that, we need DKIM (Domain Keys Identified Mail).

What is DKIM?

DKIM stands for DomainKeys Identified Mail and is a complex method of authentication that encrypts the email in transit by signing it with a digital signature which creates a unique string of characters called a “hash value.” When a receiver detects an email has been signed using DKIM, it will authenticate the message using a pair of “keys” :

1st key – “Private Key” is kept safe by the sender and cannot be shared.

2nd key – “Public Key” is stored in the DNS of the client’s From domain.

When the email is received, the receiver will use these keys to decrypt the hash value in the
header and if both keys match, it shows the email has not been altered and the DKIM signature is then verified. If the keys do not match, the DKIM signature will fail and the recipient’s ISP will be more likely to place the email in the Spam box or block it outright. But how can I see who is using my domain without my permission? Enter DMARC.

What is DMARC?

DMARC stands for Domain-based Message Authentication, Reporting & Conformance, and it’s a standard that mail servers use to determine if an incoming email is coming from sources that the domain sending the email trusts.

DMARC uses SPF or DKIM to verify if the sender is genuine, and takes authentication one step further by sending a report of who is using their domain back to the sender. For DMARC to pass, the email must pass either SPF or DKIM, and the domain in the From header must be aligned with the corresponding SPF or DKIM domain.

The main advantage of DMARC is that it’s the sender who controls what happens to spam sent using their domain, not the receiver. So you can tell the receiver to block mail you didn’t send, and better yet, you get a report of mail that is using your domain without your permission – so DMARC is very powerful and is the gold standard in use today.

Click for a quick overview on how SPF works by DMARCIAN.

Click for a quick overview on how DKIM works by DMARCIAN.

Click for a quick overview of how DMARC works by DMARCIAN.


How to authenticate your domain DNS

To do this, you will need to access the DNS records for your domain with its hosting provider and add the correct DNS settings. You can follow this guide:

  • 1. Visit your domain provider’s site and log in.
    • To find out where your domain is managed, contact the person or team that manages your website or email address.
  • If you’re not sure where to find this information, we’ve compiled the four biggest domain hosting service providers for your reference:
    * GoDaddy
    * Network Solutions
    * Domain.com
    * namecheap.com
  • You can also look up your domain host by checking this website: https://lookup.icann.org/.
  • 2. On the top right part of the platform, click on the arrow next to your username.
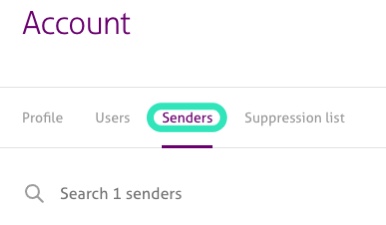
  • 3. Select Account.


  • 4. In the Account page, select the Senders tab.


  • 5. In the menu to manage the sender email addresses and domains, select the option Authenticate domain.


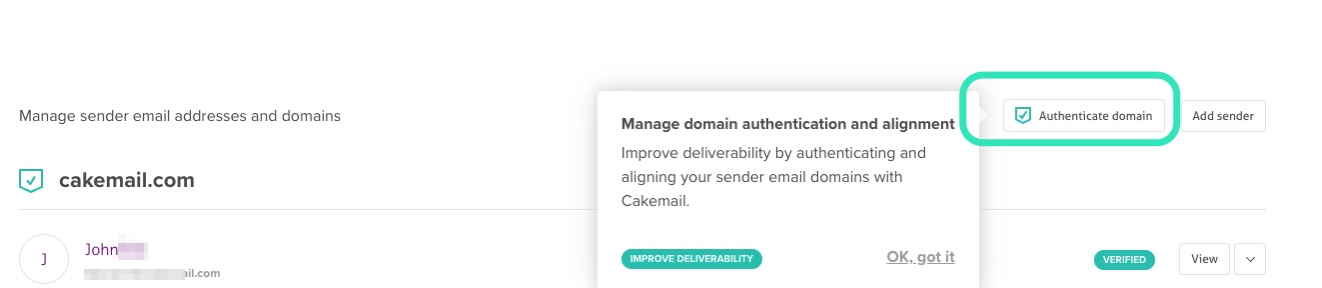
  • 6. Follow the steps outlined in this page to add the platform’s records to your DNS.
  • 7. Wait for the verification.
  • 8. The Domain authentication status is displayed on the last step.

Authenticating with DMARC

DMARC:

Please make sure you have already set up the SPF/DKIM on your From domain before proceeding with DMARC.

Once your SPF/DKIM is done, we recommend you set up an account with DMARCIAN and run through their DMARC RECORD WIZARD to create your DMARC record.

Why DMARCIAN?

DMARCIAN is a trusted partner with our application and as soon as you set up your DMARC record, you will start to get flooded with XML reports telling you who is using your domain. These reports provide insight into how your email is moving through the ecosystem and allow you to identify if anyone else is using your domain. Making sense of these reports can be tricky and they can be numerous. Not only can DMARCIAN help create your DMARC record with ease, but their platform can also be used to view these XML reports and provide visualization on how your email domains are being used so you can take action. You will need this visibility in order to ensure you do not block legitimate mail before moving your DMARC policy towards p=quarantine or p=reject.

Who will send me these reports?

What started with a small list of ISPs like AOL, Yahoo, and Gmail has grown into a long list around the world with more and more being added every day. Here is a current list of known receivers checking for DMARC:

Amazon WorkMail, AOL, Apple, ATT, BT Mail, Cisco Email Security, Comcast, Gmail, Google Apps, Hotmail, Hover, LaPoste, Libero.it, Mail.ru, Mimecast, Office 365, Onet, Proofpoint, Rackspace, Rogers, SFR, Shaw, Skynet Proximus, Sophos, SpamExperts, Symantec, Vade Secure, Yahoo! ,Yahoo! UK, Ziggo, Zoho.

The time to set up DMARC and secure your domain is now!

Continue Reading

How do I add an RSS feed to my campaign?

With mailRelate it’s easy to send automatic blog updates to a subscriber list via email. Even better, you can use Recurring Campaigns to automatically send updates to your subscribers every so often.

A Recurring Email Campaign is one that you can send over and over and happens automatically based on criteria or timelines that you set. Often email marketers or organizations will use these to send reminders and special offers, or in this case, you can use recurring emails to send links to new blog posts to your subscribers.

To include RSS updates in your email, you’ll want to design and layout your content as usual, but add in a special tag that lets you include RSS information. Do to this, you’ll want to go into the HTML source view for your campaign to make these additions.

Here is how you define the block of content that will include your RSS/blog post info:

[RSS={your url}]

[ENDRSS]

Everything between the “…” can be formatted and displayed just like regular content, but relies on merge fields to know what content to display. The merge tag looks like this:

[RSS-{your post index}-{your post field}]

Note that the post index 0 refers to the latest post, 1 to the second latest and so on.

Here is an example using the blog feed with advanced RSS:

[RSS=http://www.yourwebsite.com/blog/feed/]
<strong>Check out the latest 3 posts from our blog</strong><br />
<br />
<strong><a href=”[RSS-0-link]”>[RSS-0-title]</a></strong><br />
[RSS-0-description]<br />
<br />
<strong><a href=”[RSS-1-link]”>[RSS-1-title]</a></strong><br />
[RSS-1-description]<br />
<br />
<strong><a href=”[RSS-2-link]”>[RSS-2-title]</a></strong><br />
[RSS-2-description]
[ENDRSS]

You can also insert RSS feeds by using the following tag:

[RSS=YourURL]

In addition to what we mentioned above, there is a whole host of other RSS fields and attributes you can call upon. You’ll find them here.

Once your content is complete, you can proceed with scheduling your recurring campaign. You can schedule the days, times it will be repeated, as well as the date you want your campaign to begin. You will also be able to select when it ends: Never, On (a specific date), or No more than (how many days the campaign will run for.)

Continue Reading

How do I add a video to my campaign?

Unfortunately, many email clients will not show embedded videos. At most, they show a static image. This is also true for animated gifs, flash animations and HTML 5 playback.

For email clients that do support video playback


Such as clients on iOS and Android devices, you can use mp4, webm or ogv file types:

<video width=”600″ poster=”fallbackimage.png” controls autoplay>
<source src=”http://mydomain.com/myvideo.mp4″ type=”video/mp4″ />
<source src=”http://mydomain.com/myvideo.webm” type=”video/webm” />
<source src=”http://mydomain.com/myvideo.ogv” type=”video/ogg” />

If you don’t have access to any of these formats, only have your video on YouTube or believe that you’re better off safe than sorry, you should include a static image with a link back to the video.

The fallback link should ideally hosted on your website, Facebook page or personal YouTube Channel. This way, if neither an Android nor an iOS device is being used, an image will appear instead:

<!– Fallback if HTML5 video is not supported –>
<a href=”http://mydomain.com”><img border=”0″ src=”fallbackimage.png” label=”Fallback Image” width=”600″></a>

So the full code looks like this:

<video width=”600″ poster=”fallbackimage.png” controls autoplay>
<source src=”http://mydomain.com/myvideo.mp4″ type=”video/mp4″ />
<source src=”http://mydomain.com/myvideo.webm” type=”video/webm” />
<source src=”http://mydomain.com/myvideo.ogv” type=”video/ogg” />

<!– Fallback if HTML5 video is not supported –>
<a href=”http://mydomain.com”><img border=”0″ src=”fallbackimage.png” label=”Fallback Image” width=”600″></a>
</video>

Visit http://www.w3schools.com/html/html5_video.asp for more information about HTML 5 videos.

Grabbing screenshots:


Go to the URL of the video and pause at a point that you like. Then, take a screenshot to capture the image:

Windows Users

  • Go into your Accessories
    • Choose the “Snipping Tool” (Only available from Windows Vista onwards)
    • Choose a ‘Rectangular’ snip from the drop down.
  • Point, click and drag around the image that you want to capture
    • Save as .jpg or .PNG

Mac Users

  • ⌘+ Shift + 4
  • Point, click and drag around the image that you want to capture

Important:

  • It’s best to use videos produced by your company, or videos where you own the rights
  • Keep in mind that if you are referencing someone else’s video, there might be device or geographic limitations in its diffusion. You should also give credit where credit is due.
Continue Reading

How do I add a QR Code to my campaign?

WebbPlatsen allows you to generate and add a QR Code linked to a URL directly to your campaign.

To add one, click on the QR Code section in your email within the Email Campaign Builder.

Add Section QR

Hover over the default QR Code image and click on Edit.

QR code

Enter the address of the URL you wish to generate a QR Code for – press Generate to complete the process.


Continue Reading

How do I add a Google Map to my campaign?

WebbPlatsen allows you to generate and add a Google Map directly to your campaign.

To add a map, click on the Google Map section in your template within the Email Campaign Builder.

Add Section

Hover over the default Google Map image and click on Edit.

This is a map

Enter the address you wish to generate a Google Map for and press Generate to complete the process.

Hint: If the Google Map is not rendering the correct location of the address you entered, be sure that you enter the exact city and zip/postal code separated by commas: 123 Michigan Avenue, Miami, Florida 33139


Continue Reading

Why are my campaigns being archived?

In order to improve overall performance, detailed campaign reports for delivered campaigns that are more than six months old are automatically archived. Campaign overview reports will still include high level campaign information but the following data will be removed from the user interface for archived campaigns:

  • Click & Open Rate graph
  • Link activity
  • Detailed statistics: Opens, Unopened emails, Bounce reports, Unsubscribe Requests, Spam Complaints, Forward-to-a-Friend details, Sent Emails
  • Heatmaps

While this information will not be available in the system, it is still available for download as a .CSV file within the campaign information.

You can duplicate an archived campaign at any time.

Campaign archived

Continue Reading

What is an acceptable number of complaints, bounces and unsubscribes?

Complaints, bounces, and unsubscribes all indicate the health and overall quality of your list. They are a direct representation of how happy your recipients are in receiving your emails and affect your Sender’s Reputation.

If you regularly send engaging content to a list of people who are waiting to open your email, these numbers should be 0 (or very close to it). Each complaint or hard bounce you generate is a mark against you.

Bounces


A “hard” bounce: the address no longer exists (worse, maybe it never existed… Did you send a confirmation email?) . If not addressed, these can have dramatic consequences to your account, sometimes going as far as getting it suspended. As a result, all hard bounces will be removed from the list.

A “soft” bounce: the email is currently not available for a “temporary” reason. If there are 4 soft bounces on a single email address, the email address will be automatically removed from the list. Note: Your reports will provide you with very detailed information about the bounces on your emails, including several different types of bounces not listed above.

Why are emails removed from the list?

To avoid potential SPAM complaints. It will also help in regards to future email statistics.

Bounce Rate:

Total bounces / Total number of people you sent your email to

Expected Results:

0% – 1%

Should always be less than 5%

Variables:

  • Type of industry
  • How current is your list?
  • How frequently do you send to your list? The more often you send, the lower the rate for each campaign.

Unsubscribes


Total number of unsubscribes / Total number of people email was sent to

Understand that is much better for someone to unsubscribe than to flag you as spam.

SPAM Complaints


Total number of complaints / Total number of emails sent to specific internet service providers

As soon as someone marks you as spam, they are definitively removed from the list.

Expected Results:

0% – 0.1 %

  • Use best practices to avoid complaints and send a test to yourself (see where it lands) before sending out your campaign. Should never exceed 0.25% (1 out of 400 emails sent)


Keep in mind that ISPs look at these numbers too. If you have consistently mid to critical bounce/spam levels it is only a matter of time before your emails get sent to a recipient’s junk folder and/or get blocked permanently.

If you build a clean list and learn to avoid complaints you should be just fine.

Continue Reading

Understanding a heatmap

A heatmap is a visual representation of link activity in your campaign. You will see colors beside each link, highlighting how many times a link was clicked. Colors range from violet to bright red: (violet, blue, green, yellow, orange, and red) – the more times a link was clicked, the warmer the color (red).

You can also download a snapshot of either the Heatmap or the actual HTML campaign as it was sent as a PNG file.

Heatmap

Continue Reading