Author Archive | WebbPlatsen

How do I set my timezone?

Each user can adjust their time zone if it is different than the one set by default.

IMPORTANT NOTE: The end user’s timezone affects the time emails are set to be sent, regardless of what time the main account may be set to. When viewing an account, you will be viewing it in the timezone relative to the current user’s timezone.

To change your time zone, click on your name on the top right menu options and click on Account Settings

Set timezone

Continue Reading

Send a test

You can send a test mail at any time when you create your newsletter / campaign.

Test

Click on Send a test email and specify which address you want to send to. You also choose here if you want to send an e-mail with both a text version and an HTML version or if you want to send these separate.

The subject line will be the same as the name of your mailing followed by (MERGED VERSION) .

Note! (MERGED VERSION) is not included with sharp mailings.

Continue Reading

What is sender reputation?

As a sender, you’ll gradually acquire a reputation as you send messages over time. The combination of content, how often recipients flag your emails as junk, spam traps, and your bounce rate all contribute to this reputation.

A good reputation has a great impact on the effectiveness of your marketing efforts. A bad reputation does the exact opposite and may prevent your emails from reaching your audience at all.

Cultivate and nurture your reputation by:

  • Practicing good list hygiene
  • Sending valuable content
  • Keeping your audience engaged

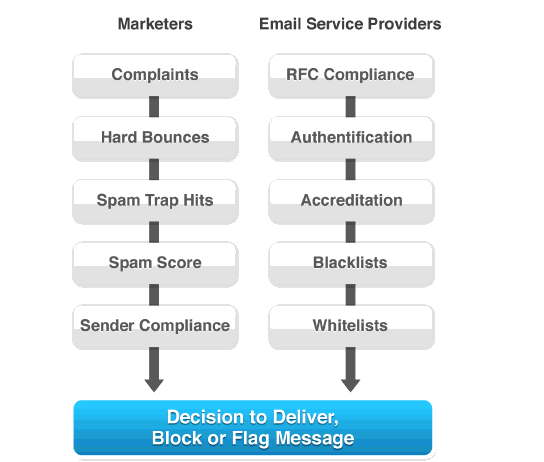
Several factors impact the reputation of a sender:


Managed by Senders

Complaints

This is the rate of formal complaints, or the number of recipients marking messages as spam. Avoiding complaints relies on sending quality content to subscribers who have opted-in to receive your emails.

Hard Bounces

The hard bounces rate is the percentage of emails you send that are sent to expired or inactive addresses. This can be managed by maintaining an up-to-date subscriber list and ensuring it’s easy for people to unsubscribe or modify their information when their contact details or circumstances change.

Spam Trap Hits

Spam traps are email addresses intentionally designed to identify spammers that are harvesting addresses off the Internet and/or senders who have poor list hygiene or opt-in practices. To avoid this, make sure your opt-in process is a double opt-in list that requires people to confirm their email address before they are added to your list and send on a regular basis.

Spam Score

This is the element of email deliverability over which senders have the most control and yet it’s often the most neglected. What matters more than words that might flag spam filters – is bad content that encourages the recipient to delete your message, opt out of future messages, block you entirely, or worst of all complain to their ISP by flagging your message as spam.

Sender Compliance

This is measured by how well you adhere to the above requirements. Each mark against you will affect how your future email is handled. How each ISP deals with this can be different – some have higher thresholds than others so you need to stay compliant in all areas in order to keep out of trouble.

Managed By Your Email Service Provider

Technical Compliance

Better known as RFC (Request for Comments), which is a set of standards for the internet as decided on by the IETF (Internet Engineering Task Force). At a high level, RFC compliance is solely the responsibility of your Email Service Provider and without it most (if not all) of your email will never make it past the initial connection

Authentication

Because spammers often masquerade as legitimate senders (claiming that their emails are coming from a real company) receivers will often look to authentication as a way to see if the sender is really who they say they are. This is especially important when using an email service provider as they may (or may not) be allowed to send on your domain’s behalf. There are four main protocols in use today (SPF/Sender ID, Domain Keys and DKIM), but because none of these protocols are dominant any reputable email marketing platform will make all available to their clients to help maximize delivery.

Accreditation

Some senders get approval from anti-spam organizations and 3rd party Reputation Providers for certifications such as Goodmail, Return Path’s SenderScore Certified and the Habaes Safelist. This means they are pre-approved or ‘whitelisted’ senders and the ISPs that use these Accreditation services will give preferential treatment to these senders by allowing more email to the inbox and quite often it will by-pass more heuristic forms of spam filtering such as content filtering, throttling or disabling links/images by default.

Blacklists

A blacklist is a list used by receiving networks to judge a given IP and/or sending domain’s reputation. These lists are run by anti-spam groups and most blacklistings are the result of sending Unsolicited Bulk Email (UBE) to addresses that never asked for it. There are many different blacklist providers in existence and some carry more weight in the community than others so it’s very important you keep your lists clean or you will run into trouble.

Whitelists

Similar to accreditation where reputation is acquired by the means of an outside source, many ISPs maintain their own internal whitelists as well. They are made up of IP addresses or domains that generate very few complaints, bounces and have a high level of engagement with their users. This can also be done by a recipient adding your From address to their Contact of ‘Safe Sender’ list or going into their Junk folder and telling the ISP your email is NOT spam.Sender Reputation

Continue Reading

Why do I need permission from contacts to add them to my list?

Permission to send emails to the contacts on your list is extremely important. Without permission from your contacts you risk the following:

  • The emails you send may be classified as spam by ISPs or recipients.
  • Violating our Terms of Use and Anti-Spam policies and those pertinent to your country. Your account can be terminated as a result.
  • Violating anti-spam laws and could get sued for doing so.
  • Generating complaints, resulting in IPs getting blocked at major ISPs all over the world.
  • Getting blacklisted for sending spam, which could filter down to your own domain and/or your hosting provider. If this happens, your hosting provider could terminate your account and you could lose your website, email and hosting service.
Continue Reading

What is a feedback loop?

A feedback loop is a data feed set up by Internet service providers (ISP) which forwards complaints originating from their users back to the sender of the original message. This complaint data is then processed by the sender so they can remove and/or permanently unsubscribe the user from the list (or lists) in question. This helps to avoid future complaints, which can seriously affect delivery.

It also gives ESPs (Email Service Providers) the ability to keep track of how many complaints are received for a given client (or campaign) so they can take the appropriate action.

People who generate a lot of complaints can cause many problems with delivery, especially if they are part of a shared IP pool used by multiple customers.

On average, a complaint rate over 0.25% (1 in 400) at any given ISP for a given mailing, is considered a problem.

Under View Detailed Statistics in your delivered campaign, you will be able to filter FBL’s by providers. These include:

  • AOL
  • Bluetie
  • Comcast
  • Cox
  • Earthlink
  • Excite
  • Hotmail/MSN
  • Lashback
  • Tucows
  • Mailtrust
  • RoadRunner
  • United Online
  • USA.net
  • Yahoo!

How we calculate the complaint rate:

total number of complaints / total number of email sent to the FBL domains

It is not divided by the total number of emails sent as this would not give the most accurate representation of your true complaint rate at each ISP.

Learn how to avoid spam complaints.

Continue Reading

What type of files can I upload?

You can upload files to either the Image folder or Files folder in the Image Library.

Type of files accepted in the Image folder

  • bmp
  • gif
  • jpeg
  • jpg
  • png

Type of files accepted in the Files folder

Note: If you try to add them to the folder Images or Flash, it will give you the error “File extension not allowed in this folder.” You must add them to the Files folder directly.

  • 7z
  • aiff
  • asf
  • avi
  • bmp
  • csv
  • doc
  • docx
  • fla
  • flv
  • gif
  • gz
  • gzip
  • jpeg
  • jpg
  • mid
  • mov
  • mp3
  • mp4
  • mpc
  • mpeg
  • mpg
  • ods
  • odt
  • pdf
  • png
  • ppt
  • pptx
  • pxd
  • qt
  • rar
  • rm
  • rmi
  • rmvb
  • rtf
  • sdc
  • sitd
  • swf
  • sxc
  • sxw
  • tar
  • tgz
  • tif
  • tiff
  • txt
  • vsd
  • wav
  • wma
  • wmv
  • xls
  • xlsx
  • zip
Continue Reading

How do I upgrade my account?

If you wish to upgrade your account, please email support by clicking on the Support link on the top right corner of your interface. You can also click on the Upgrade URL that will appear as you reach your account limits.

Continue Reading

How do I add more users to my account?

You may edit permissions for a user and grant/remove administrator access in your WebbPlatsen account.

To add a new user


  • Click on the Settings gear wheel > Manage people and permissions > Add user
  • Enter the user’s details, including first and last name, email address, and timezone. You may also choose to send the user an email with their credentials by selecting the available checkbox.
  • Select user permissions. You may assign administrator rights, or select individual access to Campaigns, Contact Lists, and Settings. These will include View Only or View and Manage.
  • Click Add User to complete the changes

Notes:
Every account must have at least one main contact. Please select one person as the main contact in case of emergency.

If you wish to display an avatar for a user, please create an account at http://gravatar.com with the same email address you are using to log in to your WebbPlatsen account.

To modify an existing user


  • Click on the Settings gear wheel > Manage people and permissions. Click on Edit next to the user you wish to edit.
  • Edit the permissions available: You may choose from View Only, View and Manage, or give them Administrator rights (which means they can access anything in the system without any restrictions)
  • Click Save to complete the changes
Continue Reading